Hey! Look who's writing about food again!

Yeah, yeah, I KNOW, it's another recipe. But trust me, you want to hear about this one. Nay, you need to hear about this one. It's another recipe that originated with the old Italian relatives (as did my ample ass, for which I am ever so grateful*), and it is incredible. I mean, who doesn't love some gnocchi, right? Even better, this is ricotta gnocchi, so it is a thousand times lighter and fluffier than the potato version that is much more readily available. Best of all, my mom was in town for a visit this week, so she demonstrated the proper technique of kneadingkneadingkneading while I sat around taking pictures and resting my cowardly biceps.

(True story: I originally got the recipe from my crazy perfectionist grandmother, and it included the step "Knead dough for 20 minutes." I made the recipe exactly once because my arms ached for two days afterward, and this was when I was 25 and moderately in shape. I relayed this info to my mother, who was all, "Oy, Grandma told you that? Bitch, please. There is maybe 10 minutes of kneading. Maybe. This is so easy, here, watch me." Mom was right, of course.**)

Ricotta Gnocchi, Which I Believe Is Italian For "OH MY HELL, THAT IS AMAZING"
You will need:
Approx. 5 1/2 cups of flour
2 lbs. part skim ricotta cheese (at room temp.)
2 eggs (at room temp.)


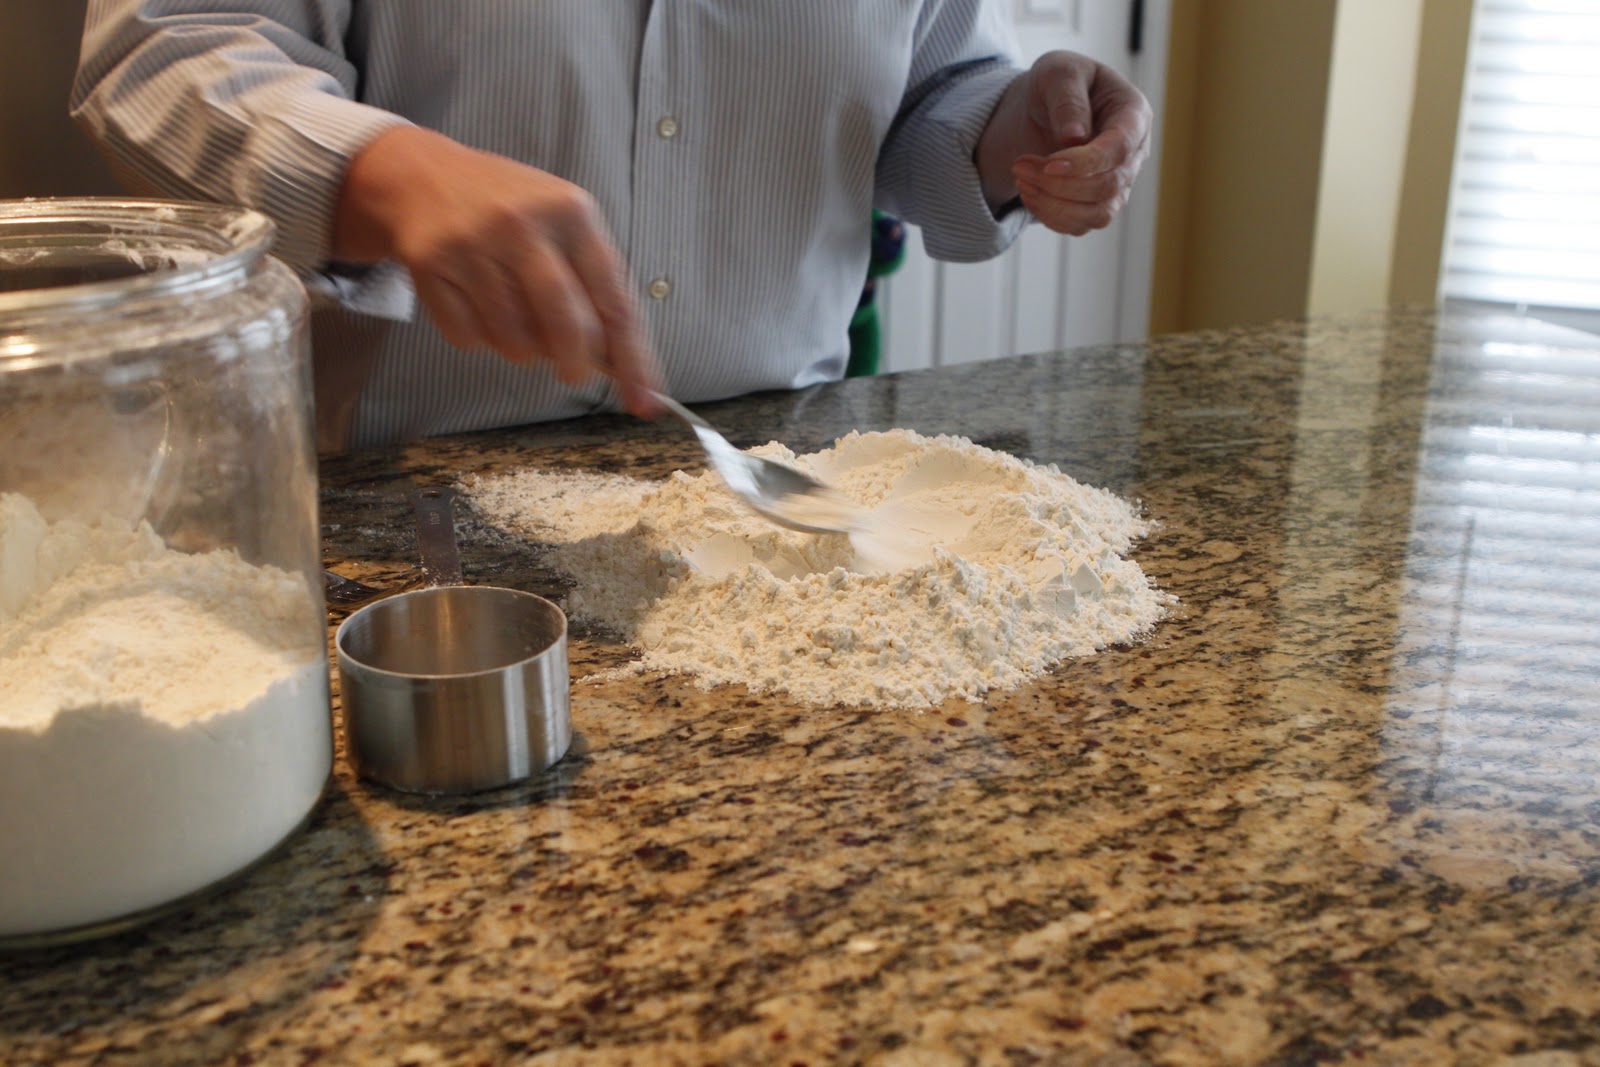
1.)  Scoop 4 cups of flour onto the counter in a mound, creating a large well in the center.
 2.)  Scoop 2 lbs. of ricotta into the flour well. You want to be sure to scoop the ricotta from the container rather than just dumping the whole thing so that you can occasionally drain off some of the excess water.
3.)  Create another well in the center of the ricotta and add in two eggs.
4.)  Slowly begin incorporating all of the ingredients, first by gently whisking the eggs:
then mixing the ricotta in with the eggs:
 and finally incorporating the flour into the egg and cheese mixture:
5.)  Once the mixture becomes too thick and gooey for the fork to be effective, just get in there with your hands, smooshing everything together until it's well combined.

 6.)  Once the ingredients are combined and sort of doughy, begin kneading, by which I mean gather up the dough, push it through with your hands, fold and gather it up again, rotate it 1/4, rinse and repeat.*** You'll want the dough to become as non-sticky as possible, so keep the counter, the dough, and your hands VERY floury. You will need to add approximately another 1 1/2 cups of flour during the kneading process, which takes about 10-ish minutes, maybe less.


7.)  You're done when the dough is not too sticky anymore and finger indents spring back just a little. Et voila--DOUGH! (You may want to check that the pasta is the right consistency by quickly cooking your first few gnocchi and giving them a try. If they're too soft, just continue kneading in more flour. Trust me, that is so much better than finishing the whole shebang and realizing your dinner is a mushy mess.)
8.)  Now for the tedious part--making the little individual gnocchi. (Gnocchi...which is plural. Huh. Individual gnoccho? But many individuals is still plural, so gnocchi? Aghhh, shut it, Kate.) Either way, cut off a small chunk of dough (maybe 1/10 or 1/12 of the ball?) and cover the remaining dough with a mixing bowl to keep it from drying out as you work. Begin rolling the chunk of dough out in your hands and on the floured counter until it is a long, round strip approximately the width of your thumb:

 then cut the strip into little pillows about the size of your fingertip.
9.)  Then we roll! Literally. Over and over, until each little pillow has been rolled into gnocchi form. If you have a gnocchi board to give it the little ridges, great, but just rolling them on the counter is fine too. Don't try to make the lines with a fork--it's a YOOGE pain in the ass. The technique is hard to explain, other than to say it's just a quick flick of the wrist while pressing on the little dough pillow with the tip of your finger. Here's mom's demo:


(Oh yeah, make sure you flour the board really well, because they can stick. Not a huge deal if they do, though--just push them off and carry on.)
10.)  To cook them, just bring a pot of water to a boil. Salt the boiling water and toss in the gnocchi. They're done once they float to the surface, like so:
They cook really quickly and turn to mush shortly thereafter, so keep a close eye on them. Toss them in whatever sauce you like, and enjoy!

Mom and I made a quick test batch, which we tossed in a little browned butter and parmesan cheese. They looked like this:
and were so good that approximately 0.3 seconds later, the plate looked like this:

The recipe makes approximately a million gnocchi (no joke--we got a little over 5 1/2 lbs of gnocchi from this batch, and we know this because my equality-focused mother weighed the gnocchi as she was separating the batch into bags (2 lbs, 13 oz each!) for my sister and me, who I would like to think are less demanding of equality now that we're, you know, adults), but they freeze beautifully. As you're rolling the individual gnocchi, place them on cookie sheets that have been covered in wax paper and dusted with flour, making sure that the gnocchi are in a single layer and not too tightly spaced.
Pop the cookie sheets in the freezer for an hour or so, until the pasta is thoroughly frozen, then transfer them to freezer bags. This will keep them from sticking together in a huge clump in the freezer. Later, the frozen pasta can go straight to the boiling water.

I know this probably seems like a mountain of work, but it took my mom about an hour and a half from start to finish, and they are SO INCREDIBLY WORTH IT.

I'm going to shut up now, because this is crazy long already, but later this week?  I promise to share the most amazing recipe for bolognese sauce, which just happens to pair perfectly with these gnocchi. Perfectly, like, To. Die. For.

*Sarcasm font!
**I may have paraphrased just a touch there.
***You know I was speaking figuratively there, right? Everyone's aware that you do not actually rinse the dough, or anything else for that matter? Ok, cool.

Placeholder

Back when I was toiling away at Satan Lucifer & Baal, LLP, I maintained a slim (and rapidly fraying) tether on sanity by emailing my law school BFF pretty frequently. She, too, was beholden to The Man (her office actually had sleeping pods so that you didn't even have to bother leaving the office, which, there are NO WORDS for that level of insanity), so the crazy email chains were a great release. I really loved taking the absurdity of law firm life--and believe me, the absurdity was abundant (um, hello, SLEEPING PODS)--and playing with language to make it funny for her. It was this friend who insisted I start this here blog (hola, KLJ!). I had tried blogging previously, but was never really able to find my voice, mostly because I had been reading blogs forever (TWoP back in the days of Felicity was my blog gateway, you guys; am OLD), so everything sounded derivative and contrived to my ears. I'm still working on finding my voice (i.e. every time I write about a recipe, I am avoiding figuring out how to talk about whatever I am really thinking about), but this is all feeling much more like me.

That said, there are some bigger issues that I don't really talk about in my real life, so to speak, therefore I am struggling with how to talk about them here. I think it's worth the struggle, though, especially because I don't talk about them with my real life people, and because so many of you all have been so bravely forthright about your own issues. I am nothing if not a follower, folks. Anyway, this is me making myself accountable to follow up on The Big Stuff: panic/anxiety issues, baby issues, career/identity issues, etc. Debbie Downer, ahoy! I kid, I kid. (I hope.)

In the meantime, my mom is in town, so she, my sister, and I are headed out for a ladies' overnight trip. I'll catch you on the flip, wherein I promise to strap on a pair and really talk, just as me. Or at least to post some really kick ass recipes while I work up the courage.

I come by my fat ass honestly.

Oh my god, you guys, I don't know what my deal has been lately. I totally fell off the Weight Watchers wagon with the whole wisdom tooth fiasco, and now? It's like I have fallen into a very, very deep pit entirely lined with carbs. It all started with the apple cake my mom made when she was visiting (remind me to do a post on that, because it is INSANE). I ate boatloads of ice cream, which I never do, but it was the only thing that helped my aching jaw feel better. It was medicinal ice cream! Since I have been feeling better, I have--for reasons I cannot begin to explain--baked multiple batches of bread (with varying degrees of success), a loaf of pumpkin bread, Smitten Kitchen's peanut butter brownies (oh my sweet LORD, go make them immediately), and finally, POTATO PANCAKES. I... I mean, who do I think I am? I can't eat any carbs without my ass turning into a freaking balloon, yet these all seemed like good decisions to me? In fairness, quite a lot of the bread was pitched because it reeeeally doesn't keep well, and nearly the entire loaf of pumpkin bread is still sitting on top of the toaster. I also sent about 3/4 of the peanut butter brownies to work with Mark because I am physically incapable of refraining from shoving them directly into my gullet every time I walk through the kitchen; they are Schedule I addictive.

The potato pancakes, though. Maaaan, do I love me some potato pancakes. Let me explain--these are NOT your traditional latke. In fact, there are no shredded potatoes involved. Rather, this recipe came from my off-the-boat Irish great-grandmother who had 11 (!) children to feed. It's sort of along the lines of boxty, but not even that complicated. My mom was very close to her grandmother, so she used to tell my sister and me about her when she would make these potato pancakes for us. We have, however, modernized the recipe for the healthier times we live in now. Yup, now we use butter to fry the potatoey goodness instead of straight lard. Much better, right?

Here's the deal:  this recipe is intended to prevent leftover mashed potatoes from going to waste, but what it will really do is cause you to accidentally make waaaay too much every time you decide to make mashed potatoes from here on out. You've been warned.

So, for this recipe, you will need some leftover mashed potatoes (obvs), some flour, butter, salt, and pepper. That's it!

1.)  Dump the potatoes onto a cutting board or piece of parchment or waxed paper. You'll want something between the dough and the counter because you're basically mixing up some glue for yourself. Skip this step, and things will get REAL during clean up.
2.)  Spread the potatoes into a thinnish layer and sprinkle heavily with flour. I scoop the flour with a soup spoon and just keep adding until the dough is the right consistency. Depending upon how much potato you're working with, you'll need somewhere between 1/4-1/2 cup of flour. PRO TIP:  Do the potato mooshing with one hand and keep the other clean to keep sticking into the flour jar.
3.)  Begin lightly kneading the flour into the potatoes, folding the potatoes up over the flour and working it through. You'll know you have enough flour incorporated when the dough holds together and isn't super sticky anymore. Give it a little sprinkle of salt and pepper, because even perfectly seasoned potatoes are going to be kinda bland once you add in all of the flour.
4.)  Spread the dough out into a 1/4-1/2" layer and cut it into wedges or squares or whatever little shapes you want. You could even be fancy and use a cookie cutter, but that would result in waste, which would be SACRILEGE, much like spilling one's wine. *Gasp*
5.)  Heat a saute pan over med-hi heat and melt a nice lump of butter. Scrape the dough wedges off of the counter with a spatula and flip them into the hot butter, letting them saute until they're golden, then flip them.

6.)  Once they're nice and golden, that's it! Dust with a little more salt if you want, and enjoy. The tough part here is going to be sharing the delicious, golden goodness, but they're intense, so it's probably for the best.

You can thank me later. Well, somewhere between tasting them and needing bigger pants, anyway.

Dens Sapientiae

Oh, you guys, all of these years, I have wondered what the hell could be so bad about having one's wisdom teeth out that causes women who have experienced births of multiple children (hi, Mom!) to blanch in horror. Well, this week? I got schooled, specifically in the extent of my wimpiness, and believe me, it is both extensive and awesome. It inspires awe, my wimpiness. Seriously, this is Post-Op Day 8 and I was in so much pain last night that I spent a couple of hours clutching a heat pack to my face before just giving in and taking my second to last vicodin and heading to bed.

Conveniently, however, I now have a metric shit ton of recipes for soft yet delicious foods. Hooray! The biggest hit of the past week was hands down the french onion soup I made after my mom went back home.* My godmother moved to the Lake Tahoe area when I was a baby and spent years working in and around the vacation industry. At some point, she came across the recipe for the french onion soup at Captain Jon's restaurant in Lake Tahoe. I have no idea when in the last thirty years this was; the soup doesn't even appear on the restaurant's current online menu. I also have no idea how much my aunt, who is an amazing cook, may have tweaked the recipe over the years. However it was developed, she gave a copy of the recipe to Mark and me for our wedding, along with these ridiculously adorable Le Creuset individual casseroles.

Super cute, right? Believe me, they would be a million times better filled with this soup and melty, pungent swiss cheese. Heaven in a bowl. The recipe is a little time consuming with the onion caramelizing, but it's so worth it, because the longer the onions have to brown and become soft and sweet and amazing, the better the end result will be. Here's what you do:

1.)  Chop onions FOREVER, while your eyes buuuurn and water, and your husband laughs so hard at your weeping that he can barely take the photos you have so kindly requested.  By this, I mean slice 4 sweet onions into thinnish half-moons.
2.)  Melt a stick (an ENTIRE STICK) of unsalted butter and add in 3 cloves of finely chopped garlic. Or, if you're lazy like I am, 3 cubes of Dorot frozen garlic puree--just as good!
3.)  Once the butter is nice and sizzly and the garlic is fragrant (HAAA, why am I talking like a tv chef?), add in the many, many onions while your eyes water anew. Blindly stir the onions to coat everything in the garlicky butter. I also may have added some thyme. Mmmm.
4.)  You want to keep the onions on a heat high enough to slowly cook them, but low enough that they develop a slow golden brown. Stir every so often for a loooong time. Think 30 minutes or more.
5.)  Once the onions look so good you consider scrapping the soup and just cramming them directly into your face, you're ready to add the rest of the ingredients. You'll need 1 1/2 tsps of Worcestershire (WUSS-ter-sheer),**
 1 1/2 tsps of dijon mustard, 2 tbsps of brandy,
and 1/2 c of sherry (I used the cheap cooking stuff and it was fine).
6.)  Stir in all of that delicious flavor,
then add in four 14 oz. cans of Swanson's beef broth (the recipe calls for Swanson's, but I would imagine 56-60 oz of whatever beef stock you have would be just fine).
7.)  Lastly, chop a small handful of fresh dill and toss it in.
Let everything simmer together for about a half hour, tasting for seasoning and adjusting salt and pepper as necessary.
 *****
Aaaand here is where I am a dramatic failure when it comes to food blogging. It was getting LATE at this point, and we were starving after nearly an hour and a half of seriously tantalizing smells. Not only did we not bother with the broiling of cheese onto garlicky croutons, we just dumped handfuls of cheese into bowls of soup and stuffed it into our faces. We didn't even use the adorable little casseroles--just regular old kitchen bowls. And obviously we didn't give a second thought to pictures until we were cleaning up after dinner. (This was only two days after the wisdom teeth removal, so there may have been some vicodin involved. Just saying.)
*****
8.)  Mind you, this last bit is theoretical, seeing as I was too impatient to bother with it myself. However, my aunt writes that you should slice a baguette and toast the slices, rubbing the toast with garlic. Ladle the soup into oven safe bowls, and float a crouton on top. Sprinkle a tiny bit of baking soda on the crouton (it makes the cheese bubble up) and cover the bowl completely with shredded gruyere. Stick the bowls on a cookie sheet and broil until the cheese is golden and bubbly. Just before serving, slip an additional teaspoon of brandy into each bowl.

It is INSANELY GOOD. In fact, you should probably run out and pick up the ingredients so that you can make it immediately. Enjoy!

*How awesome is my mom? She actually flew down from Boston to take care of me. We had one fun dinner out with my sister and her husband, then mom basically spent the rest of the week cooking soup, mac & cheese, and various other soft and tasty things--recipes to follow!
**I went to college in Worcester, MA, which most people--including my father, a lifelong Massachusetts resident--pronounce every way EXCEPT the correct way. It is not WOO-ster, WORE-ches-ter, WORE-cess-ter, or WISS-tah (ahem, Dad).

up